Distortion/Preamp
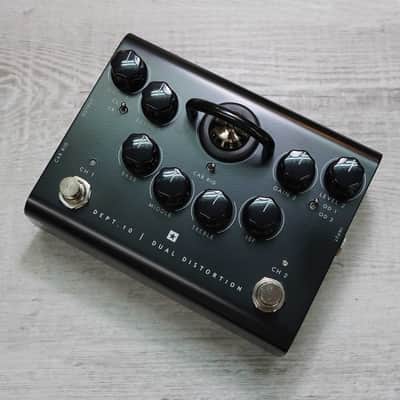
For those requiring higher gain, the Dept. 10 Dual Distortion takes things up a notch. A formidable sounding valve distortion pedal and a world-class valve recording preamp – with 3 crunch/overdrive voices alongside the clean channel, our patented ISF control, low latency USB, XLR out and Dept. 10’s proprietary Cab Rig simulator technology.
Dual Distortion includes Cab Rig, our next-generation DSP speaker simulator that reproduces the sound and feel of a miked up guitar cab in incredible detail. Deep-dive using the accompanying free software and capture the incredible tones via USB / XLR out or headphones.
Adding to this, an in-built effects loop allows for effortless integration with your pedalboard which when used with the XLR D.I. makes for a great sounding and flexible backup amp.
Key Details
- Distortion Pedal
- ECC83 Triode Valve
- 9V PSU Powered
- 2 Channels / 2 Voices Per Channel
- Patented ISF Tone Stack EQ
- XLR D.I Output
- USB Recording Output
- Stereo 1/4″ Headphone Output
- FX-Loop
- Cab Rig Speaker Simulator (3 save slots on pedal)
Top View
1. Input
Plug your guitar in here. Always use a good quality screened guitar lead.
2. Gain 1
This Gain control adjusts the amount of overdrive or distortion that Channel 1 will
deliver. As the Gain control is increased clockwise (CW) the sound will become
more overdriven moving through crunch tones until, at its maximum position, a full
crunch tone is reached.
3. Level 1
This Level control sets the overall level or volume from Channel 1 of the pedal. It
should be used in conjunction with the Gain 1 control to achieve the exact type of
drive you require. Generally speaking, at lower Gain settings, the Volume will be
increased and at higher Gain settings the Volume should be decreased.
4. Channel 1 Clean/Crunch Mode Switch
This switch enables Channel 1 to be set up as a Clean or Crunch channel. The Crunch
channel can also be used as a clean boost by running the level high and the gain low.
This will add further saturation to an already overdriven amplifier.
5. Bass
The Bass control adjusts the amount of low end frequencies in your tone. This pedal
has an advanced tone shaping circuit (shared by Channel 1 and Channel 2) which
allows the tone to be tight and cutting, counter clockwise (CCW), to warm and
thumping (CW).
6. Middle
The Middle control adjusts the amount of middle frequencies in your tone. The middle
frequencies are particularly important in getting the amount of ‘body’ your tone has.
With the Middle control set to its minimum position (fully CCW) the sound will be
aggressive and scooped, this is a tone ideal for aggressive rhythm playing. As the
Middle control is increased (CW) the amount of ‘body’ is increased, which is more
suitable for sustained lead guitar tones.
7. Treble
The treble control allows exact adjustment of the treble frequencies within the sound.
At low settings (CCW) the sound will be warm and darker in character. As the Treble
control is increased (CW) the sound will become brighter. At the maximum settings
the sound will be aggressive and cutting.
8. ISF (Infinite Shape Feature)
The patented ISF control works in conjunction with the Bass, Middle and Treble
controls. It allows you to choose the exact tone signature you prefer. Fully CCW is a
more American characteristic with a tight bottom end and more aggressive middle,
and fully CW is a British characteristic which is more ‘woody’ and less aggressive.
See illustration below.
We recommend that to start with the ISF is set to half way and the Bass, Middle and
Treble are set to taste. Then try gradually adjusting the ISF CW and CCW until you
find the sound you prefer.
9. Gain 2
This Gain control adjusts the amount of overdrive or distortion that Channel 2 will
deliver. As the Gain control is increased (CW) the sound becomes more overdriven
moving through crunch tones until, at its maximum position, a full distorted lead tone
is reached.
10. Level 2
This Level control sets the overall level or volume from Channel 2 of the pedal. It should
be used in conjunction with the Gain 2 control to achieve the exact type of drive you
require. Generally speaking, at lower Gain settings, the Volume will be increased and
at higher Gain settings the Volume should be decreased.
11. Cab Rig Switch
Select one of three Cab Rig environments. You can deep edit and load in your own
Cab Rig settings using the free Architect software.
12. Valve Guard
Through this guard you can see the ECC83 valve at the heart of your pedal.
WARNING: Do not attempt to remove the fixing screws or guard. No user serviceable
parts inside.
13. Channel 2 Overdrive 1/Overdrive 2 Mode Switch
This switches Channel 2 between Overdrive 1 or Overdrive 2 voicing.
Overdrive 2 gives more gain and saturation with a slight a lift in presence, achieving a
great sustaining lead tone.
14. Output
This output is designed for connection to the input of other pedals or the input of a
valve solid state, digital or hybrid amplifier. For best noise performance we recommend
you place the overdrive pedal first in the effects chain. The built-in buffer/line driver
is perfect for preserving your tone when using long cables, or large pedalboards,
even driving low impedance pedals like many wah-wahs. Always use a good quality
screened guitar lead.
15. Cab Rig Output
Cab Rig is our next generation DSP speaker simulator that reproduces the sound
and feel of a mic’d up guitar cab in incredible detail. Deep dive edit, make custom
patches for your cabinet, microphone, power amp and more by plugging your pedal
into our free Architect software via USB. This source will output the selected Cab
Rig switch preset, Left = 1, Middle = 2 and Right = 3. This output has the selected
Cab Rig preset applied. A DI signal can be selected within the Cab Rig software to
bypass the cabinet simulation.
NOTE: The Cab Rig output is a fully stereo 6.35mm connection and should only be
used with a stereo jack. Cab Rig output also features a low noise and low distortion
headphone driver circuit which can drive all standard headphone impedances and
can be used for silent practice.
Download Architect here:
16. Channel 1 On / Off LED
When the WHITE LED is on Channel 1 is on. When the LED is not on, Channel 1
is off.
17. Channel 1 On / Off Footswitch
Press this switch to turn Channel 1 on or off.
18. Channel 2 On / Off LED
When the RED LED is on Channel 2 is on. When the LED is not on, Channel 2 is off.
19. Channel 2 On / Off Footswitch
Press this switch to turn Channel 2 on or off.
Rear View
1. FX Loop Send
Connect the (mono) input of an external effects unit here. Insert any external effects
you want to keep clean such as reverb, delay, or modulation.
2. FX Loop Return
Connect the (mono) output of an external effects unit here.
3. DC Inlet
For the input of the 9V DC / 500mA adaptor supplied.
Only use the included power supply.
4. USB Audio Output
Plug a USB cable in here to connect the amplifier to a Windows PC or Mac.
The amplifier will appear on a personal computer as an audio capture device within
recording software. This output has the selected Cab Rig preset applied. A DI signal
can be selected within the Cab Rig software to bypass the cabinet simulation.
5. XLR Line / DI Output
A balanced output for connection to a PA, mixing desk or interface for recording and
monitoring. This source will output the selected Cab Rig switch preset. This output
has the selected Cab Rig preset applied. A DI signal can be selected within the Cab
Rig software to bypass the cabinet simulation.
Please note
- We are unable to accept price negotiations, as the listed price already reflects our best.
- The shipping fees listed on the item page are reference prices and may differ from the actual shipping cost (including Reverb and PayPal fees.) While the amounts are accurate for many countries, they may vary significantly for others.
- All customs taxes and VAT are the buyers’ responsibility. Please check out the requirements for your country.
- All items are also for sale in our physical workshop in Takadanobaba. There is a chance they might be sold out.
- We sell only at Reverb for customers from outside Japan.
- We accept payment only through Reverb platform.